Showing posts with label enamelling. Show all posts

Friday, April 27, 2012

Enamel animals for Heat Exchange in Arizona


What's been happening?

Now that Heat Exchange-exhibition at the Shemer Arts Center & Museum in Phoenix, Arizona, is over (and has moved across the Atlantic to Erfurt, Germany), I can publish my whole post for the HE-blog here, too (see below).
However, please click on the link below as the collective body of work created for the exhibition by international artists is nothing short of amazing – fascinating in its range of techniques and concepts, and for those interested in contemporary enamelling, a must see! 


* * *


Enamel animals


As a metalsmith, I’m currently interested in different types of steel which can be welded into structures that safely withstand the heat of the kiln, and the application of liquid enamels which allow me to paint metal surface like canvas. The solid structure of steel and the fluid patterns of liquid enamels create a challenging, fascinating combination for ongoing investigation.

My starting point was a steel model from last November, based on studying forms at airports. I wanted to see how I could use similar angular shapes in slightly larger object-based work. Initially, my plan was to continue developing pieces on the airport theme, but as I begun sketching, the idea of movement and a more playful concept about “flight” emerged. I decided to make two winged containers, “enamel animals”, balanced with weights in hidden compartments. I thought they could softly move, if touched, upon their curved bases.

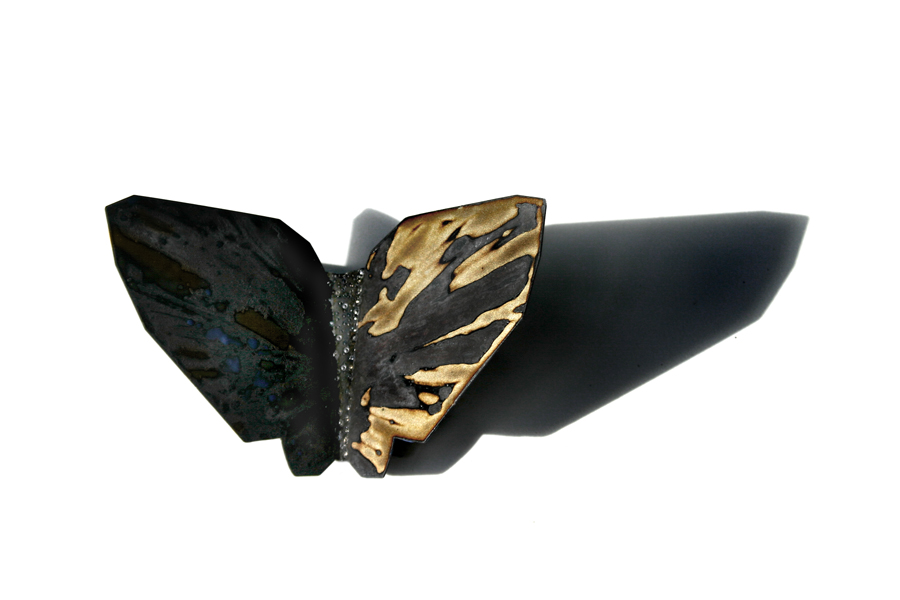
Above are some initial sketches and cardboard models of different wings, and the following images show the evolution of the two objects after welding, going through a couple of different variations of wings and noses. Here you can also see some of my first enamelling samples with liquid enamels on steel and copper, created in 2010 during the life-changing workshop by Elizabeth Turrell in Perth. These early experiments still strongly inspire my use of layers, line and colour in enamelling.

The wings slot into the objects so that they could be inserted separately, without oxidising in the high temperatures of the kiln.

The main materials used for the work were mild and galvanised steel, welded and cold-joined, then enamelled with clear liquid #969 and P3 pigment for surface texturing,
And finally, the finished pieces:


“Enamel Animals, two figures having a conversation, are carefully balanced containers with secret compartments for weights (or any other small, heavy things you might need to hide). If touched, the animals will gently rock, perhaps nodding in agreement, with quiet knowing… “


Cheers and warm regards to everyone – can’t wait to see all the final works!
Inari

Wednesday, March 21, 2012

night flight


Lately, I've been collating photos of my work in preparation of a website (knock on wood!!), and found some older pieces which I haven't yet posted here.

The dark piece above was originally a part of a larger work, and a sister to the 'white flight' pendant.


Night flight, 2010, enamel on mild steel, 18ct gold
White flight, 2010, enamel on mild steel, 18ct gold

Saturday, July 31, 2010

Wednesday, June 30, 2010

Mariposa / Butterfly: New work, 5


mariposa / butterfly (inari kiuru 2010)
mild steel, enamel, 18c gold, 925 silver

Tuesday, June 29, 2010

Out of the fire: New work, 4


1. Enamel added, waiting for the kiln

Now here's a piece of work I have quite mixed feelings about!

This piece is based on a simple black and orange close-up portrait of a cajon player, and while the design, model making and welding of the mild steel for the pendant went all smoothly, the rest of the process was riddled with trouble. Or shall we say CHALLENGE.


2. Fired pendant with enamel painted and fired orange back
3. The textured back of the main pendant part

After firing the main pendant, everything was looking OK and I liked the textured back that shows the brushstrokes as dark marks on oxidised steel. I would have been happy to leave the design at this, but thought that an extra layer would bring solidity, and I could avoid riveting the necklace attachment directly onto the pendant.


3. Back of the back, clear liquid enamel on steel, 925 attachments soldered


Soldering the silver bars to the back of the orange base (seen from the front, painted with orange, red and yellow enamel paints), to be riveted to the pendant, however was a real adventure: I had to use IT solder for it to last the heat of a kiln. On steel, making the "harder than hard" IT solder go required a true blast of heat. Luckily, nothing melted though – at this stage.

Then it came to riveting the pendant onto the base. It had warped slightly due to the many layers and firing process, so the rivets had to be firm and a little longer than usual to keep the pieces together safely and without bending the parts, thus risking breakage of the enamel layers. First I tried to hammer the ends of the rivets (1.2 mm 925 wire with 18c gold balls at the ends; this too was a bit of an accident, but gold's not so bad ; ), but found that I couldn't position the pendant anywhere securely enough, for the brisk and accurate hammer blows the riveting process requires. This I'm sure is dependent on my skill level, not the actual logistics of the piece, but neverthless, it was late at night, and …


5. The same back, after some … eventful events …

At this stage I'd used microtorch exactly once in my life. Somehow, in my desperation, I got an idea to ball BOTH ends of the wire. We had talked about this, speculating if it would work neatly should the rest of the piece be immersed in water. But no time for water at this stage, straight to the flame! The first rivet was successfull … until I smelled something burning … Yes, it was the orange enamel paint on the other side I'd forgotten about!!

I took a look and had to be optimistic in those "am" hours; I thought that a bit of flaking and ash might look OK. Hehe. "The fire of flamenco"??!

So then I decided to ball the rest of the rivets, too. What the heck! I could always repaint the enamelled orange side, as I ended up doing. But for some reason, the wire would not make a ball this time, no matter how hot I had the microtorch flame on! I even tried with a bigger torch, but to no avail. Everything just melted into soft hills. So, I decided that this shall be the look, then. Don't anyone dare call me a perfectionist, or INflexible! : P The final rivet is hammered in a traditional way, it was in the outside edge of the layers, so I could somehow manage.

After this treatment, the beautiful back was stained with black marks and melted silver. You can kind of see that for yourself in the photo. I thought that a slight sand / polishing might help it look more together, and was happily surprised that the marks from enamelling still came through after emerying the back quite heavy-handedly. Otherwise, it's a mess! : D

And the chain?
I made one, but am not happy with it really. So I'll re-make it over the break, and then present before and after images.

xx IK

Thursday, June 24, 2010

waiting for the fire


"What comes out
must go in"

From the past weeks' experiments with enamel on mild steel, objects and a pendant waiting to be fired in a kiln. They look very different pre and post the heating process. I've just finished a series of work, including the vessels above, for our first semester assessment at RMIT – I'll post some images of the final work over the weekend.

When I wake up, that is. And now back to writing an essay which will be 24 hours late : /

PS.
More enamel on steel experiments here (samples from the Elizabeth Turrell workshop in Perth, Western Australia in April), and here (the first jewellery pieces I made at RMIT using welded mild steel and liquid enamels).

I also just recently discovered Suzanne Beautyman's work, and am simply in awe of her use of the media of metal and enamel.

Monday, June 14, 2010

enamel on steel and silver

Here's a few results from my resent playtimes with mild steel and enamel …
I called these three first brooches Amazon, Caribbean and Spain, you guess which is which! They're all welded mild steel with liquid enamel, some have also glass beads; the brooch backs are sterling silver and stainless dental steel wire.


The last two pieces are May and March – the month of the Bull and the month of the Fish. These two pieces are somehow related, or at least trying to co-exist. The bull brooch has industrial cardboard and plastic on roller-printed fine silver base which was enamelled by underfiring, to match it with the matte of the other components. The square pendant is welded mild steel with liquid enamel, the attachments fabricated from 18ct gold and brass. It has a long beaded chain which I'll photograph properly in its entire length when daylight comes again. September?? : )


Click on the images for slightly larger detail.

Friday, April 30, 2010

reve(name)lations ...

A couple of weeks ago I had the privilege to attend a workshop by the renowned enamel specialist Elizabeth Turrell (UK) in Perth, as a part of the JMGA conference. It was an amazing experience. Hello fellow enamelists around Australia and back in Bristol : ) A fellow jeweller, Melissa Cameron, talks about the workshop in her blog, too, and check out the beautiful images of work also!

In short, liquid enamel on steel is my new passion. It is like painting and drawing, but on metal and glass. I love it.

Here are a few small samples (90 x 90 mm) from the three intensive and unforgettable days, and a very recent attempt (this afternoon at rmit) which began my experiments with enamel on 3D steel objects, for a silversmithing research project.


* * *


Sunday, November 22, 2009

Jewellery before RMIT 1: winter cargo


winter cargo (2003)
oxidised copper, enamel, glass beads, industrial steel netting

This neck piece was inspired by the beach in winter; what washes on the shore, how everything tangles together, the colours … Click on the image for a sharper view.